Practical 3 (Part 2)
- Syafiq
- Jul 13, 2021
- 1 min read
Good weather we are having. Having the best time of our lives especially with the SHIOK weather and for today we are making our unicorns!


For part 2 of our practical, we had to create a final product, the cardboard winged unicorn. To make the unicorn, we had to make use of joinery, namely tabs and slots in order to assemble the unicorn.
Assembly process:
For the assembly process, we first started by punching out all the cardboard parts and laying them flat on the ground, as seen in the picture below.

Afterwards, we would punch out the slots on the unicorn, as well as fold the creased edges. We would then begin the assembly of the unicorn by first building the head and the body of the unicorn, as seen in the picture below.

Finally, we would just slot the remaining parts of the unicorn together to finish the assembly of the unicorn, as shown in the pic below.

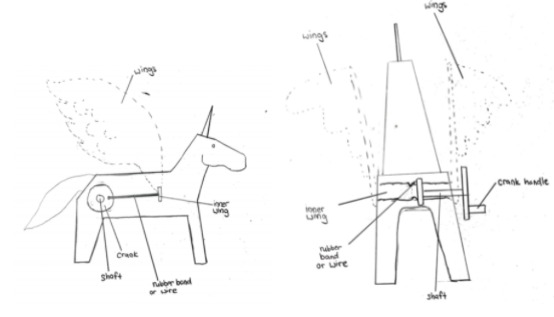
We were also tasked to find out how to make the wings move without directly touching the wings. To accomplish this, we first connected the wings on the inside of the unicorn to the inner part of the crank using a rubber band, as seen in the illustration below. We would then connect it to a shaft which in turn is connected to the handle outside of the unicorn’s body, giving us the ability to flap the wings by turning the handle.


Done by
Daniel
Comments